Mar 30, 2011

Full disclosure: "Love will find you out"


untitled

Have you got a minute? Make one. Set aside a few. You’ll need them. I had to share what might very well be one of the most painfully beautiful things I have ever read. Here’s a glimpse:
“…Go ahead, be disappointed.
Nothing turned out how you hoped.
Sit under a tree and tell me the whole of it
and I won’t say a word.
I won’t say a single word…”
It’s a journal entry by Jen Lemen who has quickly drawn me in with her words in an incredibly unexpected way.
Read the entire piece, Love will find you outhere.

By the way, I found the piece through Kind Over Matter. What a lovely little space of feel-good-ness!
Go check her out. You’ll feel better.

Why is this full disclosure? Because I'm pretty sure she's talking to me.


Mar 10, 2011

Priceless

girls boys
{POORLY adapted from source}


Another new perfect little niece was born yesterday morning. Love her.
Looks like the girls are winning. Only 3 nephews to my 4 nieces.
I got a text from my brother early in the morning saying they were at the hospital already. I walked into the office and couldn’t wait to share the good news with my boss.

“I just found out I’m getting a baby today!”

WHAT?! You’re having a baby?!”

“NO, no, no… I’m getting a baby today! My niece. Looks like she’ll be born today.”

“Oh.{whew} In that case, woohoo!”

Ohhhh the look on Boss-man’s face was priceless! And yup, he says “Woohoo.” Often.

Mar 8, 2011

2nd Monday Do-Overs


Ahhhh, someplace I'd like to be.Someplace beautiful, relaxing. I need a beach soon, something serious!

Anyway, time for another round of “Second Monday” where I insist on avoiding Tuesdays altogether by just re-doing Monday (and the last few days) a little better. If you missed it, here is the first go-around at it.

I gotta say, I feel pretty good about not having a whole lot of do-overs this time around. But if you’re counting, here they are:

---
Taste the tofu before trying to fry it. I would have found out that it’s gross and mushy and no combination of breading and/or frying would make it less so. Don’t judge.
---

Make plans sooner. Went to dinner with some girlfriends. Great time (and delicious falafel)! Just wish I hadn’t waited so long.
---

Relax. And I don’t mean in that “take a vacation” kind of relaxation. I mean, stop spazzing!! Heaven knows I worried myself silly over something that didn’t even happen.

How does the saying go? (I dunno, is there a saying!?) If you worry & it happens, then you couldn’t have stopped it; if you worry & it doesn’t happen then you worried over nothing? Who knows I’m no philosopher.

{Thanks for allowing me to spaz, V.}
---

Get the “love it” size. Because sometimes Coldstone ice cream is worth the extra pound or two. Think brownie mix and Oreo creme filling. Together. Bliss.
---

All in all, I didn’t do too bad this time around. Let’s try to keep it that way. Anything you’d like to do over, just a little better?

Mar 4, 2011

How to follow a site (Part III): Google Friend Connect


{Don’t miss Part I and Part II of “How to follow a site”}
By now you know how to use feeds to receive updates to a website and how to read that content.
Today is more about a method to connect with other readers on blogs and how to share the content you like. 

Let’s take a look at Google Friend Connect.
Friend Connect is used almost exclusively on Blogger blogs, though I believe there are widgets now available for other blogs as well (Tumblr, Wordpress, etc). This is not something used on news sites or corporate blogs. Not every blog will have this.

At its simplest, Friend Connect is a social-media tool that can be used on tons of blogs.

Here are the basics:
  • Makes it WAY easy for the blog author to see who’s following (be kind to your bloggers, won’t you?)
  • Can easily share content you like via other social apps
  • Find other readers with similar interests
  • Explore new sites from other readers
{Following on Friend Connect does not automatically subscribe you to the blog’s feed like we discussed yesterday, but you already subscribed didn’t you? Yeahhhh I thought so. However it does add the blog to your Blogger dashboard. I’ll explain that in a future post} 

Go ahead. Try it. It won’t hurt a bit. I promise.
 
Step 1: Click the "Follow" button on the site.  Some folks will have this at the bottom of their blog so be sure to scroll all the way to check for it. (Remember, some blogs don’t have this at all). 

Friend connect widget

Step 2: Choose how you follow. You should see a window open up like the one below (it may or may not already show your information, if you're already logged in to Blogger or your Google Account…) 

Google Friend Connect

If you’re not already logged in, notice you can log in using a Google Account (if you use Gmail or Blogger you already have a Google account) or any other account you already have. Excellent! (You may be redirected to another screen to log in to your other account, Twitter for example, but you’ll come back here after that.)

You should now be at this screen. Enter your name and decide if you’d like to follow publicly or privately. 

Google Friend after log in screen

You’re pretty much done!
You’ll see this to confirm. Feel free to share with your friends! *wink wink nudge nudge* 


Google Friend after confirming subscribe

Click DONE and you’ll be back on the blog. 
Now Google Friend Connect will look like this (if you followed publicly): 


Google Friend after DONE on subscribe - back on site

(If you choose to follow privately, no one will see your picture under “followers” but you’ll still see see the “Options” drop down each time you’re on the site.)

From your OPTIONS menu you can share the site (wink wink) or change your settings:

Google Friend back on site - options 
Site settings pop up

So how does this help you, the reader?!
Well, besides making it super easy to share the blog in all sorts of ways, you’ll also be able to find folks with common interests as yours. 

On the site, click any picture under “Followers” and you’ll a pop up with that member’s profile (if they created one) as well as any blogs they’ve subscribed to. 

So for example, if you’re on a surfing blog A, the followers of that blog will most likely be followers of other surfing-related blogs B and C…which you wouldn’t have known about until now!
Pretty neat, huh?

And there you have it… Google Friend Connect. 
Thanks for reading ! 

Mar 2, 2011

How to follow a site (Part II): Google Reader

{Make sure you read Part I on how to follow a site using feeds.} 

If you read Part I, did you get here by following your feed? Did you get here from your favorites bar? Your “feeds” menu in your browser? Great!

 Welcome back!

We've already discussed how to subscribe to your favorite online content using feeds, and a few different ways to read the content. Today, we'll talk about Google Reader*, another way to access all those goodies to which you've subscribed.

*You need a Google Account to access Google Reader. Good news…if you use any Google product (such as Gmail, Picasa, Blogger, iGoogle, etc)  you already have a Google Account. 
Otherwise, you can create one here using any existing email address you have (yahoo, hotmail, aol, etc).

You can find Google Reader on the main page of Google. See at the very top-left where it says “Web,” “Images,” etc? There should be a “more” up there as well. Click on the little triangle next to “more” and you’ll find Reader in a drop down menu like so:

Google Reader main page


If you’re not already signed-in to your Google Account, you’ll be directed to a log-in page first.
If you are already signed-in, then you’ll go straight to your Reader home page like this:

Google reader Home page A-F

Points of interest:
A: Easily add a subscription (aka: feed) to your Google reader by adding the website’s URL (or just use keywords & Google Reader will find it for you)
B: Tells you how many items total you have not read (Anything in bold means it’s unread)
C: Google Reader will recommend sites/articles/pages it thinks you might like based on what you've subscribed to already
D: Lists all your subscriptions & the number of unread items for each website
E: Search within your subscriptions using keywords
F: Overview of all your subscriptions (again, bold =  how many are unread).

Look at section F again. Notice that you can only see the first few lines of text for each item from the home page.
To see more, select “All items” in section B. It should now look like this:

Google Reader All Items page


Now you’ll be able to see more of each item. Almost all of the time* you’ll be able to see the entire post, pictures and all. They’ll be listed with the most recent update first. Here, of all my subscriptions, CurlyPops happens to have been the latest one to post, so hers is up at the top.
*{If you remember from yesterday, authors have the option of only publishing a summary rather than the full content, which means you’d have to click on the post’s title to see the full thing along with the pictures. For example, New York Times does that, if you’d like to see what I mean}
If you scroll to the bottom of the post, you’ll see options to share it, star it, keep it unread, etc.


Google Reader share options

You’ll also notice the next post right after it is from a different blogger, this time from Jen at Tatertots & Jello. All my subscriptions will show back-to-back because I chose “All Items” (Section B). If you were to select a particular subscription from your list (Section D) then you’d see items from just one subscription.

That’s pretty much it! You can read all your content all in one place. Of course, you could add Google Reader to your Favorites bar too.

Now, let’s run down the pros/cons of this, as well as some “advanced” features.

Pros
  • Easy to see what’s still left to read
  • Can search or filter through available content
  • Easily read through many items without leaving the page
  • Direct link to site available
  • Easily share items, or star for finding easier next time
  • Might find some interesting things with the “Recommended” feature
Cons
  • You miss out on additional information found on original website (welcome page, side bar, sponsors, etc.)
  • No ability to comment on original author’s post (so author & others can read it)
  • Site author does not benefit from "hits" to his/her site if you stay on Reader
  • Not all sites publish full content… some only publish summaries
Now for some neat things to know…
You can change which items show and how they’re sorted straight from your “All Items” page.

All items -show-
All items -view settings-

You can even tell Reader to go straight to your “All items” page rather than your “Home” page; just click on “Set as start page".”
You can also change all sorts of settings down at “Manage Subscriptions”

All items -manage subscriptions-

There you can delete subscriptions, categorize them in folders, tell Reader when to mark something as “read,” and find some neat Reader apps.

Give yourself a pat on the back... you are now a Google Reader guru. Don't worry, no one checks credentials!  Happy reading!!

{Edit: Find Part III of the series here}

Mar 1, 2011

How to follow a site (Part I): Feeds


{source}
  Oh, good! You made it!
Welcome.
{stay with me... it's a long post!}
{and sorry for the fuzzy pictures... click on the pic to get a bigger, better view}
Think about this for a minute:
What if you had to call your local TV station once a day
to find out if they had any news? 
How annoying would that be? Right?!

Would you remember to call? Or is it just not worth the trouble?
That's why they deliver to you instead!

That's kind of how a lot of websites and blogs work too.
 It can be time consuming to check in each day to see what's new, sooooo....

 you can sign up to receive updates each time something new is published!
It's one of the times when being a follower is a good thing.

Now, there are a number of ways to do this and I'm no expert by any means, but today we'll focus on what I think is one of the quickest/easiest ways to follow: feeds.

Here's a super-duper basic explanation (I'll explain the details further down):


Any site you sign up with sends out data when new content is published.
Your "feed reader" or "aggregator"  searches for updates, however often you tell it to.
He puts together all the new info and puts it in one neat little place you can read, when you're ready.
 Easy.

Let's walk through how to sign up for a feed, and where to read it.

{You may want to open a new tab or window to do each step while you read. Or you can find a printable version here (with images) or text-only}

1) Find a site which offers feeds (like my blog!)

Simply look up at the toolbar in your browser (I'll be using Explorer for today, but the "feeds" button is pretty much the same wherever...might be blue instead of orange though)

Grey button = NO feed

Places like the Bing home page or Expedia won't have feeds because they don't publish content.


Orange button = feed(s) available

Pretty much all blogs and news sites will have a feed. If it's orange, there's a feed.

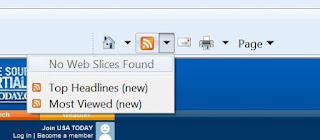
 There is more than one type of feed out there (and even web slices), but we won't get into the details. If you click on the arrow next to the orange icon, you might see things like these:
 
from Food Network blog

From USA Today


From my blog


from Wall Street Journal

2) Select a feed from the drop-down menu 

I chose the RSS feed.
 (From what I understand, Atom vs RSS mostly matters to site developers & such, not to the folks reading)

Your window (at least the upper-left corner) will now look like this:


3) Subscribe to feed
Click on "Subscribe to this feed" and you'll see this pop up:


At this point, you could:
  • Change the title of your feed (for your own reference)
  • Organize your feed in a particular folder
  • Add the feed to your Favorites Bar in your browser
Make your selections, and click "Subscribe"

Excellent! Now you'll see something like this, and you're all done!

Notice the bold "NYT > Home Page" button in my favorites bar now. Yay!

You are now officially subscribed!

Great...now what? How do I read this stuff??

Again, there are several ways... but today I'll show you just two (this post is already long enough!)
 From your "Favorites Bar" and from your browser's "Feeds" menu.

Favorites bar

This is one of my favorite methods!
If you added your feed to your favorites bar up top, you can just click on that and you'll get a drop down with a bunch of titles (posts, in this case) which, when clicked-on, will take you directly to that post.


This is also great if you want to quickly browse and find a particular item.

Pros
  • Instant notification of new content within easy view
  • Quickly browse through available content
  • Direct links to site
  • Author may benefit with "hits" from your visits (if you want to feel generous to your bloggers!)
Cons
  • Can get rather cumbersome to sort through if you follow many sites  
  • Miss out on additional information found on original site (welcome page, side bar, etc)
 Feeds menu

This is on the left-hand side of Explorer (and FireFox too, though the icon is different). In Explorer, click on "favorites" and you'll see you should have three tabs... click on "Feeds" and you'll see anything to which you've subscribed.  

Here you'll see I subscribed to the NY Times news feed.


Select the feed you'd like to see and you'll be taken to a page like this (IE's "reader"):


It lists news articles & summaries for NY Times published content.
 {NOTE: Site authors have to option to publish the full content or simply parts of it/summaries. My blog shows the full content, so technically you could read the entire blog from here, but that's no fun!}
Either way, click on the title and you'll be taken to the website.

On the right-hand side you should see a menu you can use to sort through all the items. You could filter  items tagged with a particular word or sort by date, title, author, etc.
Notice at the bottom you have a link for "View feed properties."  This is most handy if you want to change how often your feed reader searches for new stuff.


Pros
  • Can sort or filter  through available content using menu
  • Easily read through many items without leaving the page
  • Direct link to site available
Cons
  • Can get rather cumbersome to sort through if you follow many sites 
  • Miss out on additional information found on original site (welcome page, side bar, etc)
  • Site author does not benefit from "hits" to his/her site if you stay on this page
OK, whew!!! That's it for now. 
You should now be subscribed to More Than Tuesdays and should see a new item pop up in your Favorites Bar or your Feeds menu in the next few days.

Thanks for reading! I know it was waaaaay long!

Stay tuned....there's more coming!

{Edit: you can find Part II here}

Feb 28, 2011

Pizza and a What!


I'll give you another minute to stare at it and imagine just how delicious it was.
Because it was that good!

Go ahead, I'll wait.

*
*
**
***
**
*
*

Ahhhh alright, welcome back.

Recently I came home from work with a hankering for pizza and lately I've been meaning to try my hand at making bread, sooooo ... perfect timing!

I used tons of fantastic information from the ladies over at Our Best Bites as my inspiration.
 (Again, I say inspiration because I'm no good at following instructions)

I haven't tried their other recipes yet but  go over there and take a look. I mean, c'mon Chocolate Mousse Crunch Cake?! Are you serious?! *drool*  They have everything!

(You still with me, or did glance back at the picture again?? I know I did.)

I {mostly}  followed their method for pizza 101 and used their dough recipe (which apparently also makes awesome breadsticks!) to make my slacker version of their flatbread pizza.

Really easy! No, seriously, REALLY easy!  If you haven't tried your hand at this, you toooootally should.

The basics:


Mix your water, sugar, and yeast & wait till they get themselves all worked up.


Add the salt & flour, mix, knead, wait....rise. (See? Easy!)


Shape, and bake.  Mmhhhhh (I cut off a piece to try it)

While the crust is a-bakin' you can prep your toppings & make the sauce.


Caramelized onions & spinach. Delishus. Because it's SO good it makes you misspell!!
I made a basic garlic cream sauce, but Our Best Bites does have a yummy-sounding recipe for Alfredo sauce as well.  Sprinkle with some feta, and voila!


I used the garlic cream sauce for the pizza but I mixed a little of the leftover with some store-bought marinara (the combo of the two has a name, just can't remember) to use as dipping sauce. And oohhh boy was it good!!!
You know how good it was?  This good:


So go ahead, give yourself a fist bump and a Whaaat!
Don't worry, no one's looking.

Feb 22, 2011

Stampity Stamp-stamp


Stamp. Ssssss-TAMP!
That's what happy stampers sound like. I'm one of 'em.

Since recently  I was sick and gross (and tired and lazy), the sewing machine made too much noise for my liking so I found a quiet activity. Well, cleaning is a quiet activity too, but clearly I couldn't do that either!

I knew I wanted some sort of stamp for the Etsy shop so I decided to try out making my own.  And it came out great!

I hopped on over to MrArt.com and ordered some carving tools as well as some rubber-ish carving blocks. I used the "pink stuff" -- Speedball Speedy Carve blocks -- because I heard it's good for beginners. I certainly was not about to try real linonium blocks.

{source}
(SIDE NOTE: There are tons of different materials out there. Just search for "softoleum," E-Z cut printing blocks, Safety Kut, or just about any arts/crafts store or site, and look under block printing, printmaking, stamp making, etc.  There's also some really neat-looking styrofoam-type stuff so kids can "carve" their stamp with the back of a pen or something like that. No cutting!)

Design your stamp: I used the same design from my fabric labels and played around with it on Word. Print out your image.

Transfer to carving block: I used a pencil to draw over the lines on the image. Use plenty of pressure so you can get a good amount of graphite on the design. Now place your design on top of the block (right-side down) and rub the design from the back of the paper.

Darken image (optional): The second time around I found it easier to carve if I go over the transfered graphite image with a dark pen or marker before carving.

Carve: Important to carve away from you! (and away from the design too). You don't need to dig deep at all and it's best to take off a tiny little smidge at a time (rather than trying to make deep grooves each time)


At this point, you're pretty much done. Go ahead and stamp your design so you can see what you need to fix. You can go back and carve away any areas you don't want inked.


I was lucky enough that I didn't accidentally cut off any letters, considering this was my first try! I mostly just had to carve away the extra junk around the print and clean up some of the letters.

If you look at the 3rd print, there is still "gunk" on the outside, but I think I like it.... it looks like wood grain!

Lessons learned
  • get good tools.... sharp helps!
  • cut AWAY from you and the design
  • lay block on flat surface for carving
  • have some good music for listening... you might be a while
The pink stuff is a little rubbery, kinda stretchy, so there were some parts that were tricky because they sort of stretched away from me rather than cut away, but I think that also has to do with my tools being a little dull.

Also, I imagine stiffer, less stretch material might make for cleaner, crisper stamps & might hold up better over time. Dunno. This is the only stuff I've used.

Anyway, I definitely like my new stamps.


This week, I linked up over at Someday Crafts. Go check 'em out!


LinkWithin

Related Posts Plugin for WordPress, Blogger...